ハイパーマッスルエンジニア

Vim、ShellScriptについてよく書く

マークダウンで書ける無料のマインドマップツール「markmap」が最高すぎた


マインドマップのツールで悩んでいるなら朗報だ。決定版をついに見つけてしまった。

  1. マークダウンで書ける
  2. OSSで無料
  3. 見た目がおしゃれ
  4. 素のhtmlやReactに組み込める
  5. CLIツールがありGithub Actionsに組み込める
  6. vimのプラグインがある

これらの特徴を持つのがずばりmarkmapだ。

markmap.js.org

公式のサイトにデモがあってどんな感じに書けるのか試せるからぜひやってみて欲しい。

MindMeister良さそうだけど月額でお金払うのはちょっとなあ〜とか、簡単にかけてシンプルなやつが欲しいんだよな〜という人には絶対刺さる。

Github Actionsで利用

markmapにはCLIも用意されているので、それを利用してmdファイルからhtmlを生成し、htmlを画像化するアクションを作った。mdファイルをpushすると発火。

.github/workflows/generate_html.yml

name: Generate HTML And PNG

on:
  push:
    branches:
      - master
jobs:
  build:
    name: Generate
    runs-on: ubuntu-latest
    steps:
      - name: Checkout code
        uses: actions/checkout@v2
        with:
          fetch-depth: 0
      - uses: actions/setup-node@v3
        with:
          node-version: 18
          cache: npm
      - run: |
          npm install -g markmap-cli@0.14.0
          npm install node-html-to-image@3.3.0

      - name: Convert Markdown To HTML And PNG
        run: |
          rm public/*.html public/*.png
          find data -name "*.md" | while read line; do
            filename=$(basename $line | sed "s/.md//g")
            # html作成
            markmap --no-toolbar --no-open $line -o public/$filename.html
            # png作成
            node libs/html_to_image.js public/$filename.html
          done
          # 次のステップでhtml, pngのみをコミットさせたいため不要なファイルを削除
          rm package-lock.json
          git checkout package.json
          git checkout yarn.lock

      - name: Commit and push
        run: |
          git status
          if [ -n "$(git status --porcelain 2>/dev/null)" ]; then
            git config --local user.email "action@github.com"
            git config --local user.name "GitHub Action"
            git add -A
            git commit -m "generate html"
            git push origin master
          fi

markmapを組み込んだサイトを作った。

htmlを画像化したものをプレビュー表示。クリックするとhtmlを開く。

Vimで使うためのプラグイン

coc-markmapが用意されている。インストールは下記で完了。

:CocInstall coc-markmap

下記のようなコマンドを設定すれば、:MarkMapでリアルタイムに変更を反映させながらマインドマップが書ける。

command! MarkMap :CocCommand markmap.watch

終わり

自分で書いた記事をmarkmapに食わせると面白い。

参考

coc.vimの補完メニューの色を変える

coc.vimの補完メニューの選択中の色を変更したかったが苦戦したのでここに記す。
補完メニューの色を変えるには:h CocFloatingによるとPmenuが割り当てられていると書いてあったので、選択中の色を示すPmenuSelを変更したが反映されなかった。

" これは反映されなかった
hi PmenuSel guifg=#cccccc guibg=#2a3d75

解決策はここにあった。 https://github.com/neoclide/coc.nvim/issues/4011

" coc.vimの補完メニューの選択中の色を変更
hi CocMenuSel guifg=#cccccc guibg=#2a3d75

選択中の色を青っぽくできた

選択中の色ではなくメニュー自体の色を変えたいときは下記

hi CocFloating guifg=#c29976 guibg=#001622

終わりに

まずはリポジトリのIssueを検索しような!

Vimでステータスラインを自作にしたら起動速度倍になった

 
vim(nvim)の起動が遅い。由々しき事態なので対処した。
ステータスラインのプラグインをやめて自作にしたら400ms -> 200msに高速化できた。

起動速度の計測

まずは計測せねばならない。こちらの記事を参考にさせていただいた。

https://zenn.dev/uu64/articles/6518c75cdf5e02

計測方法は2種類あり、まずは素のコマンドで計測する方法。

vim --startuptime startup.log -c ":q"

startup.logが生成されるので中身を見てみるとこんな感じで読み込み順にかかった時間と経過時間を出力してくれる。

times in msec
 clock   self+sourced   self:  sourced script
 clock   elapsed:              other lines

000.019  000.019: --- NVIM STARTING ---
000.154  000.135: event init
000.323  000.169: early init
000.914  000.591: locale set
000.967  000.053: init first window
...

もう1つの方法はvim-startuptimeを使う方法。

go install github.com/rhysd/vim-startuptime@latest

でインストール。

計測

vim-startuptime -vimpath nvim

すると下記のような出力が得られる。

$ vim-startuptime -vimpath nvim
Extra options: []
Measured: 10 times

Total Average: 153.954600 msec
Total Max:     170.386000 msec
Total Min:     149.676000 msec

   AVERAGE        MAX        MIN
---------------------------------
128.453200 142.183000 124.901000: /Users/me/.config/nvim/init.vim
  6.862900   9.434000   6.499000: loading plugins
  6.431600   6.964000   6.182000: BufEnter autocommands
  5.676600   5.839000   5.636000: /Users/me/.config/nvim/colors/jellybeans.vim
  2.443500   2.463000   2.421000: /usr/local/share/nvim/runtime/filetype.vim
  2.185100   2.537000   2.106000: /Users/me/.config/nvim/dein/repos/github.com/neoclide/coc.nvim_release/plugin/coc.vim
...

10回の平均を出してくれるのでありがたい。

原因を調査したらプラグインの読み込みに時間がかかっていて、vim-airline/vim-airlineが結構重かった

他にも時間がかかっているプラグインはいくつかあったのだけれど、一番不要で効果が高かったのがvim-airline/vim-airlineだった。vim-airlineはvimのステータスラインをカスタマイズするプラグインで、モードやブランチ名の表示など、ステータスラインをリッチな見た目にしてくれる。

ステータスラインをリッチにしてくれるvim-airline

vim-airlineの設定は下記だけで特に凝ったことはしていなかった。

let g:airline#extensions#default#layout = [
    \ [ 'a', 'b', 'c'],
    \ [ 'x', 'y']
    \ ]

便利でもなく不便でもなくもはやそこに当たり前のようにあったステータスラインだったが、よくよく考えてみるともはやステータスラインにそこまで情報いらんなと思ったのでやめてみた。

自作のステータスラインにする

下記で落ち着いた。

" ==============================
"    statusline
" ==============================
hi User1 guifg=#FFFFFF guibg=#000000
hi User2 guifg=#ffffff guibg=#333333

" ブランチ名
set statusline=%9*\ \ %2*%{matchstr(fugitive#statusline(),'(\zs.*\ze)')}
" ファイル名
set statusline+=%1*\ %{expand('%')}
" ここから右寄せ
set statusline+=%=
" 現在行 / 全体行 ファイル種別
set statusline+=%l/%L\ \%y

ブランチ名、ファイル名、現在行と全体行、ファイル種別を表示。

シュッとしたステータスラインになった

ステータスラインの色については、User1〜9の値が使用できるっぽく、User1~4はpositive色、User5~9はnegative色と決まっているみたい。ただ厳密な決まりではなく自由に設定できるっぽい。
ブランチ名の表示にはfugitive#statusline()を使っていて、これはプラグインのtpope/vim-fugitiveのメソッド。ここに自作の関数を当てることもできるのだが、カーソルを移動するたびに実行されることになるのでキャッシュ戦略というか少し工夫が必要になるので、そのへんはプラグインに委ねた。

初見ではステータスラインの記法になれなくて意味がわからなかったが、いくつか他人の設定を見ていると慣れてくる。そこまで記法の種類も多くないのでたぶんすぐに慣れる。記法については下記を参考にさせていただいた。

https://qiita.com/Cj-bc/items/dbe62075474c0e29a777

終わり

vim楽しいィィ!

tree-sitter導入したメモ

エラーが出る

`tree-sitter` executable not found (parser generator, only needed for :TSInstallFromGrammar, not required for :TSInstall)

最新のneovimをインストールすれば直る

brew upgrade neovim --fetch-HEAD

tree-sitterの設定確認

:checkhealth nvim_treesitter

coc.nvimの設定を変えた

" CocConfigのdiagnostic.enableが効かなくなってしまったのでこちらで対応
let b:coc_diagnostic_disable=1

Floating Windowの変態的な使い方

f:id:rasukarusan:20211212230022j:plain

これはVim Advent Calendar 2021の14日目の記事です。

NeovimにFloating Windowが実装されて以来、様々なプラグインが開発、リプレイスされてきました。 有名所でいうとgit-messenger.vimでしょうか。Floating Windowの良い使い方だなあと感動した覚えがあります。

今日は僕が今まで開発してきたプラグインの中で、Floating Windowを変態的に使ったものを紹介したいと思います。

はじめに

記事内に折りたたまれているコードはダブルクリックでコピーが可能で、
test.vimとして保存 ->:source % -> Shift+T
で実行できるようになっています。
ぜひ手元のNeovimでお試しください。Neovim >=0.4 であれば動きます。

矩形選択&ペーストを可視化して直感化

矩形選択したものをどこにでも貼り付けられる

github.com

矩形選択からのペーストをビジュアライズするプラグインです。 矩形選択した箇所をFloating Windowにしてブロック化、カーソル移動できるところが気持ちいいですね。
文字を持ち上げる感じがVimを3D化しているようでエモいですよね。 また、ペーストしたあとにgvで再選択できるのが地味に良いところです。

テトリスペースト

ペーストをテトリスっぽくする

コード▼ こちらはヤンクしてからShift+Tを実行してください。また、できるだけ画面下で実行すると上から降ってくるのがよく見えます。

function! s:move_floating_window(win_id, relative, row, col)
  let newConfig = {
    \ 'relative': a:relative,
    \ 'row': a:row,
    \ 'col': a:col,
    \}
  call nvim_win_set_config(a:win_id, newConfig)
  redraw
endfunction

function! s:create_window(config)
    let buf = nvim_create_buf(v:false, v:true)
    let win_id = nvim_open_win(buf, v:true, a:config)
    hi mycolor guifg=#ffffff guibg=#dd6900
    call nvim_win_set_option(win_id, 'winhighlight', 'Normal:mycolor')
    call nvim_win_set_option(win_id, 'winblend', 40)
    return win_id
endfunction

function! s:transparency_window(win_id)
    let i = 0
    while i <= 50
        call nvim_win_set_option(a:win_id, 'winblend', i*2)
        let i += 1
        " 毎回redrawするとカクつくため
        if i % 2 == 0
            redraw
        endif
    endwhile
endfunction

function! s:get_col() 
    " 行番号を非表示にしている場合は調整不要なので0を返す
    if &number == 0
        return 0
    endif
    " 行数を表示している場合、行数の桁数分調整する必要がある. e.g) max_line = 100の場合3(桁)
    " +1しているのは行番号表示用ウィンドウのスペース分
    let max_line = line("$")
    return strlen(max_line) + 1
endfunction

function! s:get_width() 
    return strlen(@*)
endfunction

function! s:get_height() 
    let contents = split(@*,'\n')
    return len(contents)
endfunction

function! s:paste_to_current_window(number_of_line)
    if a:number_of_line == 1
        let @* = substitute(@*,"\n","","g")
        let @* = @* . "\n"
    endif
    execute 'normal p'
endfunction

" ペーストする内容を入れる(表示する)ための空行を挿入
function! s:insert_empty_line(row)
    let i = 0
    while i < a:row
        call append(expand('.'), '')
        let i += 1
    endwhile
endfunction

function! s:delete_empty_line(row)
    execute 'normal ' . a:row . 'j'
    execute 'normal ' . a:row . '"_dd'
    execute 'normal ' . a:row . 'k'
endfunction

function! s:main()
    let start_row = 10
    let col = s:get_col()
    let width = s:get_width()
    let height = s:get_height()
    let config = { 'relative': 'editor', 'row': start_row, 'col': col, 'width': width, 'height': height, 'anchor': 'NW', 'style': 'minimal',}
    if width == 0 || height == 0
        return
    endif

    let win_id = s:create_window(config)

    " floating windowにクリップボードの内容をペースト
    execute 'normal P'
    " フォーカスをカレントウィンドウに戻す
    execute "0windo " . ":"

    " floating windowを上から降らす
    let move_y = line(".") - line("w0") - start_row
    let i = 0
    while i <= move_y
        call s:move_floating_window(win_id, config.relative, config.row + i + 1, config.col)
        sleep 10ms
        let i += 1
    endwhile

    " ペースト内容を表示するための空行を挿入
    call s:insert_empty_line(height)

    " floating windowを透明化
    call s:transparency_window(win_id)

    " カレントウィンドウにクリップボードの内容をペースト
    call s:paste_to_current_window(height)

    " 事前に挿入した空行を削除
    call s:delete_empty_line(height)

    " floating windowを削除
    call nvim_win_close(win_id, v:true)
endfunction

nnoremap <silent> T :call <SID>main()<CR>

ペーストを上から降らしてかっこよくします。
winblendで透明度を動的に変更することでスパーク感を演出しています。

また同じような理論でデリートもテトリスっぽくできます。こちらは選択した行の幅をstrdisplaywidthで取得し、Floating Windowでブロック化して分割することでテトリスらしさを醸し出すことに成功しています。

デリートのほうがテトリスっぽい

コード▼

function! s:create_window(config)
    let buf = nvim_create_buf(v:false, v:true)
    let win_id = nvim_open_win(buf, v:true, a:config)
    return win_id
endfunction

function! s:move_floating_window(win_id, relative, row, col)
  let newConfig = {'relative': a:relative, 'row': a:row, 'col': a:col,}
  call nvim_win_set_config(a:win_id, newConfig)
  redraw
endfunction

function! s:focus_to_main_window()
    execute "0windo :"
endfunction

function! s:get_col() 
    " when `set nonumber` not need adjustment
    if &number == 0
        return 0
    endif
    " not support over 1000 line file
    return 4
endfunction

function! s:split_words()
    let words = split(getline('.'), '\zs')
    let result = []
    let index = 0
    let i = 0
    let word = ''
    let split_num = 7
    while i < len(words)
        let word = word . words[i]
        if i % (len(words)/split_num)  == 0 && i != 0
            call insert(result, word, index)
            let word = ''
            let index += 1
        endif
        let i += 1
    endwhile
    call insert(result, word, index)
    return result
endfunction

function! s:fall_window(win_id)
    let move_y = line('w$') - line('.')
    let config = nvim_win_get_config(a:win_id)
    for y in range(0, move_y)
        call s:move_floating_window(a:win_id, config.relative, config.row + y + 1, config.col) 
        sleep 4ms
    endfor
endfunction

function! s:set_color_random(win_id)
    let color = '#' . printf("%x", Random(16)) . printf("%05x", Random(69905))
    let hl_name = 'ClipBG' . a:win_id
    execute 'hi' hl_name 'guifg=#ffffff' 'guibg=' . color
    call nvim_win_set_option(a:win_id, 'winhighlight', 'Normal:'.hl_name)
endfunction

function! s:create_words_window()
    let row = line('.') - line('w0')
    let col = s:get_col()
    let win_ids = []
    let words = s:split_words()

    for word in words
        let width = strdisplaywidth(word)
        if width == 0
            continue
        endif
        let config = {
            \'relative': 'editor',
            \ 'row': row,
            \ 'col': col,
            \ 'width': width,
            \ 'height': 1,
            \ 'anchor': 'NW',
            \ 'style': 'minimal',
            \}
        let win_id = s:create_window(config)
        call add(win_ids, win_id)

        call s:set_color_random(win_id)
        " call nvim_win_set_option(win_id, 'winblend', 100)

        call setline('.', word)
        call s:focus_to_main_window()
        let col += width
    endfor
    return win_ids
endfunction

function Random(max) abort
  return str2nr(matchstr(reltimestr(reltime()), '\v\.@<=\d+')[1:]) % a:max
endfunction

function! s:main() abort
    let win_ids = s:create_words_window()

    " fall current line
    call setline('.', '')
    for win_id in win_ids
        call s:fall_window(win_id)
    endfor
    execute 'normal dd'

    " close each floating window
    for win_id in win_ids
        call nvim_win_close(win_id, v:true)
    endfor
endfunction

call s:focus_to_main_window()

nnoremap <silent> T :call <SID>main()<CR>

ボタンを作って発射する

ENTERでボタンPUSH&弾発射

コード▼

let g:button_window = {}
hi FrontColor guibg=#F27200
hi BackColor guibg=#AC5D24

function! s:center(str)
  let width = nvim_win_get_width(0)
  let shift = floor(width/2) - floor(strdisplaywidth(a:str)/2)
  return repeat(' ', float2nr(shift)) . a:str
endfunction

function! s:move(direction, value)
  let front_win = nvim_get_current_win()
  let back_win = g:button_window[front_win]
  for id in [front_win, back_win]
    let config = nvim_win_get_config(id)
    if a:direction == 'x'
      let config.col += a:value
    else
      let config.row += a:value
    endif
    call nvim_win_set_config(id, config)
  endfor
endfunction

function! s:remove_button() abort
  let front_win = nvim_get_current_win()
  let back_win = g:button_window[front_win]
  call nvim_win_close(back_win, v:true)
  call nvim_win_close(front_win, v:true)
  call remove(g:button_window, front_win)
endfunction

function! s:create_window(config, ...) abort
  let hi_group = a:1
  let transparency = get(a:, '2', 0)
  let buf = nvim_create_buf(v:false, v:true)
  let win = nvim_open_win(buf, v:true, a:config)
  if hi_group != ''
    call nvim_win_set_option(win, 'winhighlight', hi_group)
    call nvim_win_set_option(win, 'winblend', transparency)
    call nvim_win_set_config(win, a:config)
  endif
  return win
endfunction

function! s:fire() abort
  let front_win = nvim_get_current_win()
  let conf = nvim_win_get_config(front_win)
  let row = conf.row + 1
  let col = conf.col + conf.width
  let width = 2
  let height = 1
  let config = { 'relative': 'editor', 'row': row, 'col': col, 'width': width, 'height': height, 'anchor': 'NW', 'style': 'minimal', }
  let ballet = s:create_window(config, 'Normal:FrontColor')

  for i in range(1, 30)
    let config.col += 1
    call nvim_win_set_config(ballet, config)
    redraw
    sleep 10ms
  endfor

  call nvim_win_close(ballet, v:true)
endfunction

function! s:push() abort
  let front_win = nvim_get_current_win()
  let back_win = g:button_window[front_win]
  let config = nvim_win_get_config(front_win)
  let config.row += 1
  call nvim_win_set_config(front_win, config)

  sleep 100ms
  redraw

  let config.row -= 1
  call nvim_win_set_config(front_win, config)

  call s:fire()
endfunction

function! s:main() abort
  let row = 20
  let col = 20
  let width = 20
  let height = 3
  let config = { 'relative': 'editor', 'row': row, 'col': col, 'width': width, 'height': height, 'anchor': 'NW', 'style': 'minimal' }

  " 影の部分
  let back_config = deepcopy(config)
  let back_config.row += 1
  let back_win = s:create_window(back_config, 'Normal:BackColor')

  " 前面の部分
  let front_win = s:create_window(config, 'Normal:FrontColor')
  call setline(2, s:center('Button'))
  call cursor(2, 0)

  nnoremap <buffer><nowait><silent> l :call <SID>move('x', 2)<CR>
  nnoremap <buffer><nowait><silent> h :call <SID>move('x', -2)<CR>
  nnoremap <buffer><nowait><silent> j :call <SID>move('y', 2)<CR>
  nnoremap <buffer><nowait><silent> k :call <SID>move('y', -2)<CR>
  nnoremap <buffer><nowait><silent> :q :call <SID>remove_button()
  nnoremap <CR> :call <SID>push()<CR>

  " 影と前面のウィンドウを紐付け
  let g:button_window[front_win] = back_win
endfunction

call s:main()

Floating Windowではボタンも作れます。さらには弾を発射することも可能です。
ボタンに見せるには全面と背面で2枚のFloating Windowを利用し、背面の色をちょっと暗くするとボタンに見えます。この辺はVimというよりデザインの話ですね。デザイナーもVimをやる時代です。

行飛ばしで選択してコピー

飛ばし飛ばしに行を選択してコピー

github.com

Vimでは飛ばし飛ばしの行を選択してコピーや削除するといったことが簡単にはできないので作りました。
ただ、実を言うとこれはFloating Windowを使っていません。「ExtMark」というNeovimの別の機能を使っています。 当初はFloating Windowで実装していたのですが、ExtMarkを使ったほうが動作が軽くなり、画面をまたぐ移動選択も可能になったためリプレイスしました。
ExtMarkもFloating Windowと同じぐらい変態的な使い方がまだまだ隠されていると思っているので、紹介させていただきました。

Vimでビートマニア(@skanehiraさん作)

Vimでビートマニア
引用元: Vimでビートマニアする

github.com

最後にこちらは他の方が作られたプラグインですが、「ああなかなかに変態だな...」と感じたため紹介させていただきます。作られたのはゴリラ界で最も有名なVimmerである@skanehiraさん、通称gorillaさんですね。 こちらはFloating WindowではなくVimのpopup windowを利用されているようです。timer_startを利用した非同期処理はとても参考になります。

最後に

Floating Windowのいろいろな使い方を紹介しました。まだまだこれら以外にもマニアックな使い方があると思います。
こんなプラグインもあるよという方、ぜひコメント欄にて教えてほしいです。また、これからプラグインを作る方にとって何かしらの刺激になっていたら幸いです。

これからもVimで最高に遊んでいきたいですね。ではまた。

VimでmessagesやhighlightなどのExコマンドの結果を別タブで開く

f:id:rasukarusan:20210919130720p:plain

:tabe
:put = execute('messages')

めちゃくちゃシンプル。
今まで下記のようなredirを利用した関数を作って実行していたけど、完全に不要だった。

function! s:show_ex_result(cmd)
  redir => message
  silent execute a:cmd
  redir END
  if empty(message)
    echoerr "no output"
  else
    tabnew
    setlocal buftype=nofile bufhidden=wipe noswapfile nobuflisted nomodified
    silent put=message
    normal gg
  endif
endfunction
command! -nargs=+ -complete=command ShowExResult call s:show_ex_result(<q-args>)
:ShowExResult messages

参考

vim.blue

終わり

てか結局このモードの名前なんなん....

macOSでneovimをbuildするとき「ninja: error: loading 'build.ninja': No such file or directory」のエラーが出る

f:id:rasukarusan:20210912194149p:plain

.depsファイルが邪魔しているのでそれを削除するとbuildできるようになる。

cd neovim
sudo rm -rf .deps
sudo rm -rf build # buildも一応消しておく

buildし直す

sudo make CMAKE_INSTALL_PREFIX=$HOME/neovim/nvim install

環境

  • macOS BigSur 11.23
  • neovim nightly(NVIM v0.6.0-dev+254-g413e86869)

【Neovim】好きな位置にテキストを埋め込んだりハイライトできる「ExtMark」の使い方

f:id:rasukarusan:20210822204151p:plain
 

ExtMarkとは

指定した行、列にマーカーをセットできる。セットしたマーカー(位置)に好きな文字列を表示したり、ハイライトできたりする。
テキストの変更を追跡して表示できるので、インデント幅の表示やスペルミスを表すために使われたりする。
ヘルプは:h api-extended-marksで引けます。

実際どのようなものなのか

見たほうが早いのでExtMarkでできることの一例を載せる。

好きな位置をハイライト

好きな位置に文字列を挿入、テキストの変更も追跡する

使い方

ExtMarkの作成

test.vimを作成し、下記を記載してsource %してみましょう。

let g:mark_ns = nvim_create_namespace('myplugin')
let g:mark_id = nvim_buf_set_extmark(0, g:mark_ns, 0, 5, {"end_col" : 10, "hl_group" : "Visual"})

1行目の5文字目から10文字目がハイライトされます。

f:id:rasukarusan:20210822202936p:plain:w500
文字列をハイライト

ハイライトの他に、文字を表示させることもできます。VirtualTextというものですね。

let g:mark_ns = nvim_create_namespace('myplugin')
let g:mark_id = nvim_buf_set_extmark(0, g:mark_ns, 0, 5, {
      \ "virt_text":[
          \ ['Hello', 'ErrorMsg'],
          \ ['World!', 'Visual']
        \ ],
      \ "virt_text_pos" : 'overlay',
      \})

"virt_text_pos" : 'overlay''overlay'ではなく'eol'にすると、行末にテキストを表示させることができます。

作成したExMarksの一覧を取得

call nvim_buf_get_extmarks(0, g:mark_ns, 0, -1, {})

結果は下記のような配列で返ってきます。

[
  [1, 0, 5], " [マークID, 行, 列]
  [2, 1, 5],
  [3, 4, 10],
]

マーカーの詳細を取得したい場合はオプションに"details": 1を追加します。

echo nvim_buf_get_extmarks(0, g:mark_ns, 0, -1, {"details": 1})
" [
"    [1, 0, 5, {'hl_group': 'Visual', 'priority': 4096, 'end_col': 10, 'end_row': 0}],
"    [2, 0, 5, {'hl_group': 'Visual', 'priority': 4096, 'end_col': 10, 'end_row': 0}], 
" ]

また、特定のマーカーを取得したい場合はnvim_buf_get_extmark_by_idで取得できます。

call nvim_buf_get_extmark_by_id(0, g:mark_ns, g:mark_id, {})

ExtMarkの削除

削除するときは作成時に返ってくるmark_idを利用します。

call nvim_buf_del_extmark(0, g:mark_ns, g:mark_id)

現在バッファのExtMarkすべてを削除する場合は、一覧取得のnvim_buf_get_extmarksを利用します。

" 現在バッファのExtMarkすべて削除
let extmarks = nvim_buf_get_extmarks(0, g:mark_ns, 0, -1, {})
for extmark in extmarks
    let mark_id = extmark[0]
    call nvim_buf_del_extmark(0, g:mark_ns, mark_id)
endfor

ExtMarkの使いみち

ドキュメントに書いてあるとおり、インデント幅の表示やlinterプラグインなどと相性が良さそうです。
いくつかExtMarkを使ったプラグインを紹介しておきます。

nvim-select-multi-line

github.com

好きな行を選択し、yankやdeleteができるプラグイン。選択した行のハイライトにExtMarkを利用している。

gesture.nvim

github.com

マウスジェスチャーで指定したアクションを実行できるプラグイン。マウスの軌跡を表示するのにExtMarkを利用。めちゃくちゃおもしろい。 解説記事もあります。

zenn.dev

nvim-dap

github.com

デバッグアダプター。描画目的ではなく、シンプルにセットしたマーカーから行・列を取得し、ごにょごにょするという使い方をされている。

おわりに

Floating Windowに続く描画の新たな可能性が広がるAPIで、アイデア次第で色々できそうなのがいい!
しばらくExtMarkでできることを模索していきたい。 あと、テキストの追跡をどうやっているのかは下記の記事がわかりやすくて面白かったのでぜひ読んでおきたい。

blog.atom.io

カーソル下の関数だけ実行できるVimスクリプトを作った

f:id:rasukarusan:20210620091652p:plain
 
vimでshellスクリプトを書いてるとき、ある関数だけ実行したい、ってのがよくある。そのとき毎回コメントアウトしていたのが面倒であった。例えば下記のような場合。

main() {
    echo 'main'
}
main2() {
    echo 'main2'
}

main
# main2 # mainだけ実行したいのでmain2はコメントアウト

逆にmain2を実行したいときは、mainをコメントアウトしてmain2のコメントアウトを外して実行、みたいな流れをしていた。
実行にはvim-quickrunを使用しているので\rで実行できて楽だが、いかんせんコメントアウトが面倒だった。

カーソル下、もしくは関数のブロック内でCtrl-Jを押したら実行されるようにしたい

vim-rest-consoleを触っていて、Ctrl-Jで実行できる操作感の良さを知った。こんな感じでshellスクリプトを書いているときも実行したい。

それで作ったのがこれ。

カーソル下または関数ブロック内でCtrl-jを押すと実行される

全体のソース

完全に自分仕様になっている。shellスクリプト限定だし、関数の宣言はxxx() {のように書かないといけないなど、自分以外は使えないかもしれん。

" =============================================
" カーソル下の関数を実行
" 関数ブロック内で実行も可能
" =============================================
nnoremap <silent><nowait><C-j> :call <sid>exec_this_method()<CR>
function! s:exec_this_method() abort
  let allowFileType = ['sh', 'bash', 'zsh']
  if match(allowFileType, &ft) == -1 | return | endif

  let targetScript = expand('%:p')
  " スクリプト内の関数を全て取得
  let methods = split(system('grep -P "\(\) {" ' . targetScript . ' | tr -d "() {"'), '\n')

  " 引数ありの場合に対応するため、<cword>ではなく現在行を取得して対象の関数を抽出する
  let currentLine = split(getline('.'), ' ')
  let targetMethod = len(currentLine) > 0 ? currentLine[0] : '' 

  " カーソル下の文字列が関数であるかを判定
  let index = match(methods, targetMethod)
  if index == -1 " 関数ではない場合(関数ブロック内で実行した場合)
    let line = line('.')
    while line > 0
      let line -= 1
      let matchLine = matchstr(getline(line), '.*() {')
      if matchLine != ''
        let targetMethod = substitute(matchLine, '() {', '', 'g')
        let index = match(methods, targetMethod)
        break
      endif
    endwhile
  endif
  " 探索しても見つからなかった場合、終了
  if targetMethod == ''
    echo 'target not found'
    return
  endif

  " 対象メソッドの実行のみを残したスクリプト文字列を生成
  call remove(methods, index)
  " 対象メソッド以外を除外するためのsed文を作成 ex) sed -e '/^main$/d' -e '/^main /d'
  let sed = 'sed'
  for method in methods
    let sed = sed . ' -e "/^' . method . '$/d"' . ' -e "/^' . method . ' /d"'
  endfor

  " 生成した文字列をスクリプトとして実行できるよう一時ファイルに保存
  let tempfile = tempname()
  call system(sed . ' ' . targetScript . ' > ' . tempfile)

  " 一時ファイルを実行
  execute ':QuickRun ' . &ft . ' -srcfile ' . tempfile
  echo 'exec ' . targetMethod
  call system('rm ' . tempfile)
endfunction

quickrunに実行と結果出力は任せる

quickrunは下記のようにファイルを指定してあげると、実行して結果を現在のバッファ内に出してくれる。

:QuickRun sh -srcfile test.sh

また、ファイルではなくとも文字列を渡すことで実行も可能。

:QuickRun sh -src "echo 'hoge'"

ヘルプが日本語で書かれているのでめちゃくちゃ理解しやすい。

ちなみに自分のquickrunの設定は下記。

let g:quickrun_config={
  \'_': {
  \  'split': ''
  \},
\}
set splitbelow
" \rで保存して実行、画面分割を下に出す
nnoremap \r :cclose<CR>:write<CR>:QuickRun -mode n<CR>
xnoremap \r :<C-U>cclose<CR>:write<CR>gv:QuickRun -mode v<CR>

今回作ったVimスクリプトは、「実行対象のメソッドを抽出し、quickrunが実行できる形にする」をしているだけ。

終わり

実行対象のメソッドを抽出するとき愚直にgrepでやってるけど他にいい方法がないか模索中。

M1MacBook、VimのquickrunでC#の実行環境を整える

f:id:rasukarusan:20210523222217p:plain

知人がC#をやり始めて、教えてくれと言われたのでとりあえず開発環境を整えてみた。

環境

  • M1 MacBookAir
  • Neovim >= 0.5

brew install monoができない

arm版だとダメ的な問題でエラーが出てインストールできないので、Visual Studioから引っ張ってくるやり方でいく。

1. Visual Studio for Macをインストール

https://visualstudio.microsoft.com/ja/vs/mac/

実際にVisual Studioを使うわけではない。インストールするとc#のコンパイルに必要なmcsと、実行に必要なmonoのbinが手に入る。

2. aliasを貼る

c#のコンパイルのためにmcs、実行のためのmonoのaliasを貼る

ln -s /Library/Frameworks/Mono.framework/Versions/Current/bin/mcs /usr/local/bin
ln -s /Library/Frameworks/Mono.framework/Versions/Current/bin/mono /usr/local/bin

3. コンパイルして実行してみる

Sample.cs

using System;

namespace sample
{
    class Program
    {
        static void Main(string[] args)
        {
            Console.WriteLine("Hello!");
        }
    }

}

コンパイル&実行

# コンパイル
mcs Sample.cs
# Sample.exeが生成される

# 実行
mono Sample.exe
# Hello!

コンパイルと実行を一括でやってくれる関数を作っておくと便利

.zshrc

# c#ファイル(.cs)をコンパイルして実行
# ln -s /Library/Frameworks/Mono.framework/Versions/Current/bin/mono /usr/local/bin
# ln -s /Library/Frameworks/Mono.framework/Versions/Current/bin/mcs /usr/local/bin
# をあらかじめ実行していること
alias ms='_mcs_and_mono'
_mcs_and_mono() {
  local fileName=${1/\.*/}
  mcs $1
  mono ${fileName}.exe
}

使い方

ms Sample.cs
# Hello!

4. Vimのquickrunで実行する

mcs, monoのaliasを貼った時点で、特になんの設定もなくquickrunで.csファイルの実行ができるようになっているはず。

f:id:rasukarusan:20210523221433g:plain
quickrunでc#のファイルを実行

一応quickrunの設定を載せておく

let g:quickrun_config={
  \'_': {
  \  'split': ''
  \},
\}
set splitbelow
" \rで保存して実行、画面分割を下に出す
nnoremap \r :cclose<CR>:write<CR>:QuickRun -mode n<CR>
xnoremap \r :<C-U>cclose<CR>:write<CR>gv:QuickRun -mode v<CR>

M1 MacでNeovimをBuildする

f:id:rasukarusan:20210507165121p:plain

NevimのBuild手順が少しわかりづらかったのでまとめておく。

環境

  • M1 MacBookAir(Big Sur)

事前準備

brew install cmake

手順

Homebrewでインストールしたnvimを上書きする場合

git clone https://github.com/neovim/neovim.git
cd neovim
make CMAKE_BUILD_TYPE=RelWithDebInfo
sudo make install

確認

nvim --version

f:id:rasukarusan:20210507165204p:plain
バージョンが0.5.0になっている

上書きしたくない場合(指定のPATHにnvim実行ファイルを作成)

git clone https://github.com/neovim/neovim.git
cd neovim
# Desktopにnvimディレクトリが作成される
sudo make CMAKE_INSTALL_PREFIX=$HOME/Desktop/nvim install

確認

cd ~/Desktop/nvim
./bin/nvim --version

f:id:rasukarusan:20210507165218p:plain
指定したPATHのbinにnvimの実行ファイルが作成される

brewで最新版をインストールする

brew upgrade neovim --fetch-HEAD

Vimで特定の行だけ選択してコピーするプラグイン

f:id:rasukarusan:20210417235631p:plain
 
vimのVISUALモードはシンプルかつパワフルで特に不満はないのだが、行を飛ばしてコピーができない。 例えば下記のようなファイルがあったとして、

line 1
line 2
line 3

line1とline3だけコピーしたいようなケース。

このような隣接していない行のコピーを実現するプラグインを作った。

github.com

Neovim限定

デモ

飛ばし飛ばしに行を選択してコピー

選択した後deleteもできる

インストール

好きなプラグインマネージャーでインストール可能

[[plugins]]
repo = 'Rasukarusan/nvim-select-multi-line'

設定

プラグインをインストールするとsml#mode_on()という関数が使えるようになるので、init.vimにmappingを追加する。

" SPACE + v でセレクトモードを開始
nnoremap <Space>v :call sml#mode_on()<CR>

使い方

ノーマルモードでSPACE + vでセレクトモード開始。
vで1行ずつ選択、Vで複数行選択(普段のvimのVと同じ動き)。

yankした後に選択した文字列を出力したくなければ、g:sml#echo_yank_strを0にセットすればいい。デフォルトは1。init.vimに下記を記載。

let g:sml#echo_yank_str = 0

実装

どうもvimには特定の行だけハイライトするという機能がないみたいなので、FloatingWindowを使ってあたかも選択しているかのように見せている。
ただ1行ごとにFloatingWindowを作っているため、行を選択するごとに動作がもっさりしてしまう。たぶん複数行選択のところは1枚のFloatingWindowにするとかでパフォーマンスあげられるきがする。
あとスクロールすると位置がズレるのも悲しい。

終わり

プラグインとしての完成度は未熟だけど、自分的には満たせてるから、公開した。

細々と修正していきたい。

【Vim】aleでハイライトがされない問題の修正

f:id:rasukarusan:20210225160859p:plain

色がつかなくて困っていた

Lintを非同期実行できるプラグインのale。NeovimのVirtual Textにも対応していて、Lintエラーの文言を下記のように表示できる。

f:id:rasukarusan:20210225155306p:plain
Virtual TextでLintエラーを表示

上記画像では黄色でハイライトされているが、以前までハイライトがされなくて困っていた。let g:ale_set_highlights = 1にしてもつかなくてどうしたものかと思っていたが、先日解決策を見つけたので残しておく。

autocmdでALEWarning,ALEErrorを再設定すればいける

これで色がつくようになる。

autocmd VimEnter,SourcePost * :highlight! ALEError guifg=#C30500 guibg=#151515
autocmd VimEnter,SourcePost * :highlight! ALEWarning  guifg=#ffd300 guibg=#333333

highlight! ALEError guifg=...を設定すればいけるんじゃないかと思っていたが、それだけだとどうやら処理のどこかでclearに設定されてしまうっぽい。

f:id:rasukarusan:20210225155330p:plain
:highlight ALEErrorを実行してみるとclearになっていることがわかる
そもそもALEErrorをハイライト設定していないと、そんな定義ないよと怒られる。

なのでautocmdでファイルを開いたときまたは再読み込みしたときにhighlightを再定義すると、ちゃんと色がつく。
バグなのか他のプラグインやtmuxとの相性が悪いのか、原因は定かではないがIssueには一応上がっていた。

github.com

let g:ale_set_highlights = 1について

let g:ale_set_highlights = 1にすれば色がつくようになると思っていたが、そうじゃないらしい。g:ale_set_highlights実際のコードに色をつけるかどうか、の判定フラグだった。

f:id:rasukarusan:20210225155714p:plain
let g:ale_set_highlights = 1の場合
結構重くなってしまうので、0にした。

prettierやeslintも同じ

これは自分だけかもしれないが、ファイルを保存した際prettierで自動整形する、ということをaleで行っている。
自動整形はされるのだが、ファイルを一度再読み込みしないと発動されなかった。これもハイライトと同様でautocmdによって回避可能であった。

let g:ale_fix_on_save = 1
" vimrcを再読込みしないとfixersが未定義になってしまうため、autocmdで設定した
autocmd VimEnter,SourcePost * :let b:ale_fixers = ['prettier', 'eslint']

設定すると、再読み込みしなくても保存したら自動整形されるようになった。

Neovim: Floating Windowでボタンを作る

f:id:rasukarusan:20210202232641p:plain

Floating Windowをボタンにしないなんてもったいない!

Floating Windowを使って立体的なボタンを作ってみた。ENTERでボタンを押せる。

ボタンに見せるにはどうするか

f:id:rasukarusan:20210202230401p:plain:w500
これだけでボタンに見える

  • frontとbackの2枚のウィンドウを用意
  • backの色をfrontの色よりちょっと暗く
  • 押されたときにbackを覆い隠すようにfrontの位置を下げる

これでボタンになる。Floating Windowを2枚用意して、ENTERが押されたら位置を下げて戻せば押したように見える。

ソース

let g:button_window = {}
hi FrontColor guibg=#F27200
hi BackColor guibg=#AC5D24

function! s:center(str)
  let width = nvim_win_get_width(0)
  let shift = floor(width/2) - floor(strdisplaywidth(a:str)/2)
  return repeat(' ', float2nr(shift)) . a:str
endfunction

function! s:remove_button() abort
  let front_win = nvim_get_current_win()
  let back_win = g:button_window[front_win]
  call nvim_win_close(back_win, v:true)
  call nvim_win_close(front_win, v:true)
  call remove(g:button_window, front_win)
endfunction

function! s:create_window(config, ...) abort
  let hi_group = a:1
  let transparency = get(a:, '2', 0)
  let buf = nvim_create_buf(v:false, v:true)
  let win = nvim_open_win(buf, v:true, a:config)
  if hi_group != ''
    call nvim_win_set_option(win, 'winhighlight', hi_group)
    call nvim_win_set_option(win, 'winblend', transparency)
    call nvim_win_set_config(win, a:config)
  endif
  return win
endfunction

function! s:push() abort
  let front_win = nvim_get_current_win()
  let back_win = g:button_window[front_win]

  let config = nvim_win_get_config(front_win)
  let config.row += 1
  call nvim_win_set_config(front_win, config)

  sleep 100ms
  redraw

  let config.row -= 1
  call nvim_win_set_config(front_win, config)
endfunction

function! s:main() abort
  let row = 20
  let col = 20
  let width = 20
  let height = 3
  let config = { 'relative': 'editor', 'row': row, 'col': col, 'width': width, 'height': height, 'anchor': 'NW', 'style': 'minimal' }

  " 影の部分
  let back_config = deepcopy(config)
  let back_config.row += 1
  let back_win = s:create_window(back_config, 'Normal:BackColor')

  " 前面の部分
  let front_win = s:create_window(config, 'Normal:FrontColor')
  call setline(2, s:center('Button'))
  call cursor(2, 0)
  nnoremap <buffer><nowait><silent> :q :call <SID>remove_button()
  nnoremap <CR> :call <SID>push()<CR>

  " 影と前面のウィンドウを紐付け
  let g:button_window[front_win] = back_win
endfunction

call s:main()

せっかくなのでENTERで弾を発射できるようにする

ENTERでボタンPUSH&弾発射

ついでにhjklで移動できるようにもした。

let g:button_window = {}
hi FrontColor guibg=#F27200
hi BackColor guibg=#AC5D24

function! s:center(str)
  let width = nvim_win_get_width(0)
  let shift = floor(width/2) - floor(strdisplaywidth(a:str)/2)
  return repeat(' ', float2nr(shift)) . a:str
endfunction

function! s:move(direction, value)
  let front_win = nvim_get_current_win()
  let back_win = g:button_window[front_win]
  for id in [front_win, back_win]
    let config = nvim_win_get_config(id)
    if a:direction == 'x'
      let config.col += a:value
    else
      let config.row += a:value
    endif
    call nvim_win_set_config(id, config)
  endfor
endfunction

function! s:remove_button() abort
  let front_win = nvim_get_current_win()
  let back_win = g:button_window[front_win]
  call nvim_win_close(back_win, v:true)
  call nvim_win_close(front_win, v:true)
  call remove(g:button_window, front_win)
endfunction

function! s:create_window(config, ...) abort
  let hi_group = a:1
  let transparency = get(a:, '2', 0)
  let buf = nvim_create_buf(v:false, v:true)
  let win = nvim_open_win(buf, v:true, a:config)
  if hi_group != ''
    call nvim_win_set_option(win, 'winhighlight', hi_group)
    call nvim_win_set_option(win, 'winblend', transparency)
    call nvim_win_set_config(win, a:config)
  endif
  return win
endfunction

function! s:fire() abort
  let front_win = nvim_get_current_win()
  let conf = nvim_win_get_config(front_win)
  let row = conf.row + 1
  let col = conf.col + conf.width
  let width = 2
  let height = 1
  let config = { 'relative': 'editor', 'row': row, 'col': col, 'width': width, 'height': height, 'anchor': 'NW', 'style': 'minimal', }
  let ballet = s:create_window(config, 'Normal:FrontColor')

  for i in range(1, 30)
    let config.col += 1
    call nvim_win_set_config(ballet, config)
    redraw
    sleep 10ms
  endfor

  call nvim_win_close(ballet, v:true)
endfunction

function! s:push() abort
  let front_win = nvim_get_current_win()
  let back_win = g:button_window[front_win]
  let config = nvim_win_get_config(front_win)
  let config.row += 1
  call nvim_win_set_config(front_win, config)

  sleep 100ms
  redraw

  let config.row -= 1
  call nvim_win_set_config(front_win, config)

  call s:fire()
endfunction

function! s:main() abort
  let row = 20
  let col = 20
  let width = 20
  let height = 3
  let config = { 'relative': 'editor', 'row': row, 'col': col, 'width': width, 'height': height, 'anchor': 'NW', 'style': 'minimal' }

  " 影の部分
  let back_config = deepcopy(config)
  let back_config.row += 1
  let back_win = s:create_window(back_config, 'Normal:BackColor')

  " 前面の部分
  let front_win = s:create_window(config, 'Normal:FrontColor')
  call setline(2, s:center('Button'))
  call cursor(2, 0)

  nnoremap <buffer><nowait><silent> l :call <SID>move('x', 2)<CR>
  nnoremap <buffer><nowait><silent> h :call <SID>move('x', -2)<CR>
  nnoremap <buffer><nowait><silent> j :call <SID>move('y', 2)<CR>
  nnoremap <buffer><nowait><silent> k :call <SID>move('y', -2)<CR>
  nnoremap <buffer><nowait><silent> :q :call <SID>remove_button()
  nnoremap <CR> :call <SID>push()<CR>

  " 影と前面のウィンドウを紐付け
  let g:button_window[front_win] = back_win
endfunction

call s:main()

終わり

いまのところ全く実用性はないけど、どこかで使うときが来ると思う。たぶん。

Neovim: Floating Windowに枠線をつける

f:id:rasukarusan:20210131132056p:plain

FloatingWindowには枠線をつけるオプションがない

border:1pxのようなオプションは用意されていない。ただ、枠線があるように見せることは可能。
下記はこちらの記事で作成したときのもの。カレンダーを表現するのに枠線付きのFloatingWindowが必要だった。ソース

カレンダーを枠線FloatingWindowで表現

枠線付きのFloatingWindowを作成する

枠線用にもう一枚FloatingWindowを作り、同じ位置にFloatingWindowを重ねることで枠線付きのFloatingWindowを表現する。

" コンテンツ用ウィンドウの作成
function! s:create_contents_window(config) abort
  let config = {'relative': 'editor', 'row': a:config.row + 1, 'col': a:config.col + 2, 'width': a:config.width - 4, 'height': a:config.height - 2, 'style': 'minimal'}
  let buffer = nvim_create_buf(v:false, v:true)
  return nvim_open_win(buffer, v:true, config)
endfunction

" 枠線用ウィンドウの作成
function! s:create_border_window(config) abort
  let width = a:config.width
  let height = a:config.height
  let top = "╭" . repeat("─", width - 2) . "╮"
  let mid = "│" . repeat(" ", width - 2) . "│"
  let bot = "╰" . repeat("─", width - 2) . "╯"
  let lines = [top] + repeat([mid], height - 2) + [bot]
  let buffer = nvim_create_buf(v:false, v:true)
  call nvim_buf_set_lines(buffer, 0, -1, v:true, lines)
  return nvim_open_win(buffer, v:true, a:config)
endfunction

" 2つで1つのウィンドウとしてみせる
function! s:new_window(config) abort
  call s:create_border_window(a:config)
  call s:create_contents_window(a:config)
endfunction

" ex.) 使い方
let config = { 'relative': 'editor', 'row': 30, 'col': 30, 'width': 50, 'height': 20, 'anchor': 'NW', 'style': 'minimal'}
call s:new_window(config)
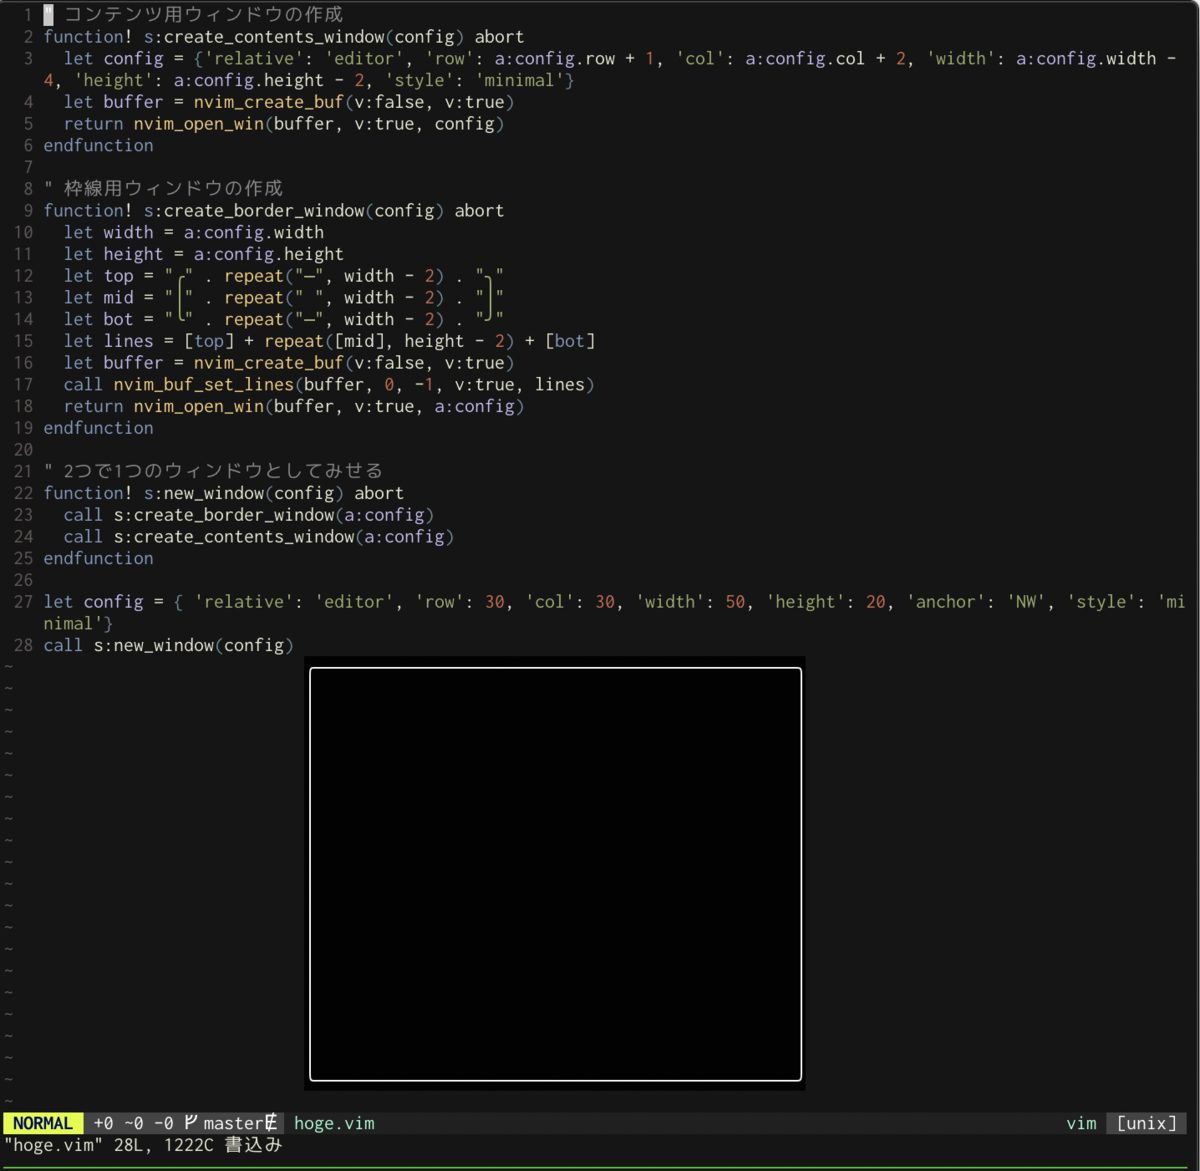
f:id:rasukarusan:20210131125717p:plain:w600
枠線付きのFloatingWindow

参考: Feature: optional floating window borders

FloatingWindowにコンテンツを載せる

nvim_buf_set_lines()を使うと配列で1行ずつセットできるので直感的。下記ではfieldという配列を用意し、一行ずつコンテンツ内容を記載している。

let field =
  \ ['今日の日付']
  \ + ['']
  \ + ['2021/01/31']
call nvim_buf_set_lines(buffer, 0, -1, v:true, field)
" コンテンツ用ウィンドウの作成
 function! s:create_contents_window(config, field) abort
  let config = {'relative': 'editor', 'row': a:config.row + 1, 'col': a:config.col + 2, 'width': a:config.width - 4, 'height': a:config.height - 2, 'style': 'minimal'}
  let buffer = nvim_create_buf(v:false, v:true)
  call nvim_buf_set_lines(buffer, 0, -1, v:true, a:field)
  return nvim_open_win(buffer, v:true, config)
endfunction

" 2つで1つのウィンドウとしてみせる
 function! s:new_window(config, field) abort
  call s:create_border_window(a:config)
  call s:create_contents_window(a:config, a:field)
endfunction

let config = { 'relative': 'editor', 'row': 30, 'col': 30, 'width': 50, 'height': 20, 'anchor': 'NW', 'style': 'minimal'}
let field =
  \ ['今日の日付']
  \ + ['']
  \ + ['2021/01/31']

call s:new_window(config, field)

f:id:rasukarusan:20210131125729p:plain:w600
配列で直感的に内容を指定できる

:qで閉じるとき、2回実行する必要がある

追記:
:qを上書きしなくても、autocmd BufWinLeaveを利用すればシンプルに削除処理を登録できる。
下記をコンテンツウィンドウに設定すればOK。

" ウィンドウ削除処理を、コンテンツ用ウィンドウに登録
call nvim_command('autocmd BufWinLeave <buffer> call s:close_window()')

" 下記が:qを上書きするスタイル。BufWinLeaveを使ったほうが美しい。
" nnoremap <buffer><nowait><silent> :q<CR> :call <SID>close_window()<CR>

参考:https://www.2n.pl/blog/how-to-write-neovim-plugins-in-lua.md

追記ここまで

枠線用とコンテンツ用の2つのFloatingWindowがあるので、完全に閉じるには2回:qを実行しないといけない。
ただ、これはちょっと面倒くさいので1回の:qで両方とも閉じられるようにする。要はコンテンツ用ウィンドウのIDと枠線用ウィンドウのIDを紐付けしておけばいいので色々やり方はある。今回はディクショナリ型を使って実装してみる。

" 枠線用ウィンドウとコンテンツウィンドウを紐付ける連想配列
let s:window_ids = {}

" コンテンツ・枠線のウィンドウを削除
function! s:close_window(...)
  let contents_window_id = a:0 == 0 ? nvim_get_current_win() : a:1
  let border_window_id = get(s:window_ids, contents_window_id, -1)
  if border_window_id != -1
    call nvim_win_close(contents_window_id, v:true)
    call nvim_win_close(border_window_id, v:true)
    call remove(s:window_ids, contents_window_id)
  endif
endfunction

" 2つで1つのウィンドウとしてみせる
function! s:new_window(config, field) abort
  let border_window_id = s:create_border_window(a:config)
  let contents_window_id = s:create_contents_window(a:config, a:field)
  " コンテンツ用ウィンドウと枠線用ウィンドウを紐付ける
  let s:window_ids[contents_window_id] = border_window_id
  " ウィンドウ削除処理を、コンテンツ用ウィンドウに登録
  nnoremap <buffer><nowait><silent> :q<CR> :call <SID>close_window()<CR>
  return contents_window_id
endfunction

let config = { 'relative': 'editor', 'row': 30, 'col': 30, 'width': 50, 'height': 20, 'anchor': 'NW', 'style': 'minimal'}
let field =
  \ ['今日の日付']
  \ + ['']
  \ + ['2021/01/31']
call s:new_window(config, field)

:qnnoremapで上書きするスタイル。<buffer>オプションをつけているので、元のウィンドウにはキーバインドが登録されず、FloatingWindowにだけ登録される。s:close_window(...)では引数を取れるようにしてある。こうすることでコンテンツウィンドウにフォーカスが乗っていなくても、IDさえ知っておけばどこからでも削除できる。

" どこからでも削除できるようTに削除処理を登録、みたいなことができる
let contents_window_id = s:new_window(config, field)
nnoremap T :call <SID>close_window(contents_window_id)<CR>

移動できるようにする

hjklで作成したウィンドウを移動できるようにしてみる。

function! s:move(direction, value)
  let contents_window_id = nvim_get_current_win()
  let border_window_id = get(s:window_ids, contents_window_id, -1)
  for id in [contents_window_id, border_window_id]
    let config = nvim_win_get_config(id)
    if a:direction == 'x'
      let config.col += a:value
    else
      let config.row += a:value
    endif
    call nvim_win_set_config(id, config)
  endfor
endfunction

" 2つで1つのウィンドウとしてみせる
function! s:new_window(config, field) abort
  let border_window_id = s:create_border_window(a:config)
  let contents_window_id = s:create_contents_window(a:config, a:field)
  " コンテンツ用ウィンドウと枠線用ウィンドウを紐付ける
  let s:window_ids[contents_window_id] = border_window_id
  " ウィンドウ削除処理を、コンテンツ用ウィンドウに登録
  nnoremap <buffer><nowait><silent> :q<CR> :call <SID>close_window()<CR>
  " 移動操作を登録
  nnoremap <buffer><nowait><silent> l :call <SID>move('x', 1)<CR>
  nnoremap <buffer><nowait><silent> h :call <SID>move('x', -1)<CR>
  nnoremap <buffer><nowait><silent> j :call <SID>move('y', 1)<CR>
  nnoremap <buffer><nowait><silent> k :call <SID>move('y', -1)<CR>
  return contents_window_id
endfunction

hjlkでFloatingWindowを移動。ちょっとおもしろい。

これを応用したvim-block-pasteというプラグインを以前作った。

www.rasukarusan.com

最終的なソース

" 枠線用ウィンドウとコンテンツウィンドウを紐付ける連想配列
let s:window_ids = {}

" コンテンツ用ウィンドウの作成
function! s:create_contents_window(config, field) abort
  let config = {'relative': 'editor', 'row': a:config.row + 1, 'col': a:config.col + 2, 'width': a:config.width - 4, 'height': a:config.height - 2, 'style': 'minimal'}
  let buffer = nvim_create_buf(v:false, v:true)
  call nvim_buf_set_lines(buffer, 0, -1, v:true, a:field)
  return nvim_open_win(buffer, v:true, config)
endfunction

" 枠線用ウィンドウの作成
function! s:create_border_window(config) abort
  let width = a:config.width
  let height = a:config.height
  let top = "╭" . repeat("─", width - 2) . "╮"
  let mid = "│" . repeat(" ", width - 2) . "│"
  let bot = "╰" . repeat("─", width - 2) . "╯"
  let lines = [top] + repeat([mid], height - 2) + [bot]
  let buffer = nvim_create_buf(v:false, v:true)
  call nvim_buf_set_lines(buffer, 0, -1, v:true, lines)
  return nvim_open_win(buffer, v:true, a:config)
endfunction

function! s:move(direction, value)
  let contents_window_id = nvim_get_current_win()
  let border_window_id = get(s:window_ids, contents_window_id, -1)
  for id in [contents_window_id, border_window_id]
    let config = nvim_win_get_config(id)
    if a:direction == 'x'
      let config.col += a:value
    else
      let config.row += a:value
    endif
    call nvim_win_set_config(id, config)
  endfor
endfunction

" コンテンツ・枠線のウィンドウを削除
" コンテンツウィンドウIDを引数で指定できるようにしておくと便利
function! s:close_window(...)
  let contents_window_id = a:0 == 0 ? nvim_get_current_win() : a:1
  let border_window_id = get(s:window_ids, contents_window_id, -1)
  if border_window_id != -1
    call nvim_win_close(contents_window_id, v:true)
    call nvim_win_close(border_window_id, v:true)
    call remove(s:window_ids, contents_window_id)
  endif
endfunction

" 2つで1つのウィンドウとしてみせる
function! s:new_window(config, field) abort
  let border_window_id = s:create_border_window(a:config)
  let contents_window_id = s:create_contents_window(a:config, a:field)
  " コンテンツ用ウィンドウと枠線用ウィンドウを紐付ける
  let s:window_ids[contents_window_id] = border_window_id
  " ウィンドウ削除処理を、コンテンツ用ウィンドウに登録
  nnoremap <buffer><nowait><silent> :q<CR> :call <SID>close_window()<CR>
  nnoremap <buffer><nowait><silent> j :call <SID>move('y', 1)<CR>
  nnoremap <buffer><nowait><silent> k :call <SID>move('y', -1)<CR>
  nnoremap <buffer><nowait><silent> l :call <SID>move('x', 1)<CR>
  nnoremap <buffer><nowait><silent> h :call <SID>move('x', -1)<CR>
  return contents_window_id
endfunction


let config = { 'relative': 'editor', 'row': 30, 'col': 30, 'width': 50, 'height': 20, 'anchor': 'NW', 'style': 'minimal'}
let field =
  \ ['今日の日付']
  \ + ['']
  \ + ['2021/01/31']

let contents_window_id = s:new_window(config, field)
nnoremap T :call <SID>close_window(contents_window_id)<CR>

終わり

hjklで移動できると楽しいのでぜひやってみてほしい。