以前もkali-linuxの構築について書いたが、余分な設定とかも書いていたのでまとめる。
Mac環境
$ vagrant -v
Vagrant 2.2.3

$ VBoxManage -v
5.2.26r128414
vagrant構築
Vagrantfile
Vagrant.configure("2") do |config|
    config.vm.box = "kalilinux/rolling"
    config.vm.box_version = "2019.3.0"
    config.vm.network :private_network, ip: "192.168.56.100"
    config.vm.provider :virtualbox do |v|
        v.gui = false
        v.customize [ "modifyvm", :id, "--memory", 2048]
        v.customize [ "modifyvm", :id, "--nic2","NatNetwork"]
        v.customize [ "modifyvm", :id, "--nictype2","82540EM"]
        v.customize [ "modifyvm", :id, "--nicpromisc2","allow-all"]
    end
    config.vm.provision "ansible_local" do |ansible|
      ansible.playbook = "playbook.yml"
    end
end
kalilinux/rollingって何?
ローリングディストリビューションは、Ubuntuのような安定したバージョン(固定リリースモデル)で更新されるのではなく、常に更新されるディストリビューションです。
rollingの意味は「更新され続ける」ってことっぽい。まあよくわからんがめっちゃ最新ってことなんだろう、きっと。別にkaliにだけ名付けられる名前じゃなくて、linux系にはよくつけられる名称。
構築
~/Desktop/kali-linux
$ vagrant up
Bringing machine 'default' up with 'virtualbox' provider...
==> default: Box 'kalilinux/rolling' could not be found. Attempting to find and install...
    default: Box Provider: virtualbox
    default: Box Version: 2019.3.0
==> default: Loading metadata for box 'kalilinux/rolling'
    default: URL: https://vagrantcloud.com/kalilinux/rolling
...
確認
~/Desktop/kali-linux
$ vagrant ssh

Linux kali 5.2.0-kali3-amd64 #1 SMP Debian 5.2.17-1kali1 (2019-09-27) x86_64

The programs included with the Kali GNU/Linux system are free software;
the exact distribution terms for each program are described in the
individual files in /usr/share/doc/*/copyright.

Kali GNU/Linux comes with ABSOLUTELY NO WARRANTY, to the extent
permitted by applicable law.
Last login: Sat Oct  5 09:38:34 2019 from 10.0.2.2
vagrant@kali:~$

# rootになれることも確認
vagrant@kali:~$ sudo su -
root@kali:~$
とりあえずこれでkali-linux環境は立ち上がっていることを確認できた。
usb-wifiの認識
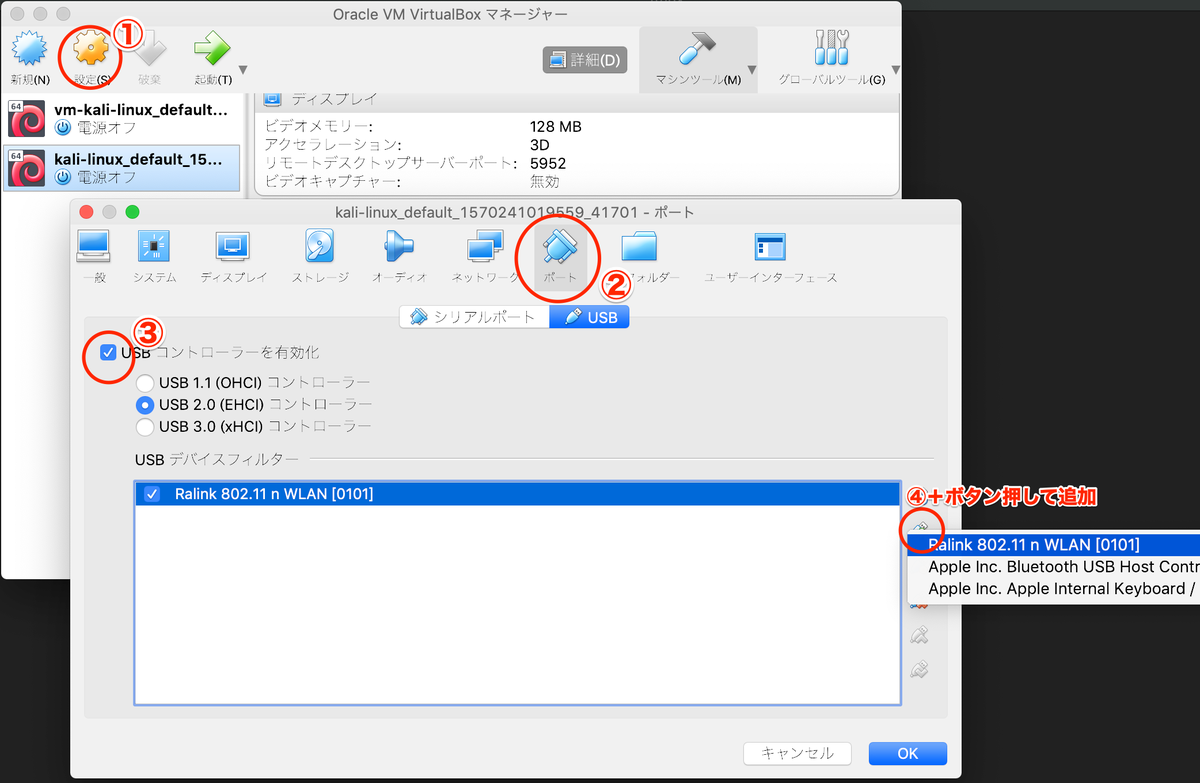
Virtualboxで設定をするため、一度vagrantを落とす
~/Desktop/kali-linux
$ vagrant halt
==> default: Attempting graceful shutdown of VM...

これで設定は完了。vagrantを立ち上げて確認する。
このとき一度USBは抜いておく。vagrant up が終わってからもう一度差す。
こうしないとkaliがusbを認識しない。
~/Desktop/kali-linux
$ vagrant up

Bringing machine 'default' up with 'virtualbox' provider...
==> default: Checking if box 'kalilinux/rolling' version '2019.3.0' is up to date...
...

# ここでUSBを差す

~/Desktop/kali-linux
$ vagrant ssh

...
Last login: Fri Oct  4 23:10:10 2019 from 10.0.2.2

vagrant@kali:~$ sudo su -
root@kali:~$ iwconfig
lo        no wireless extensions.

eth1      no wireless extensions.

wlan0     IEEE 802.11  ESSID:off/any
          Mode:Managed  Access Point: Not-Associated   Tx-Power=20 dBm
          Retry short  long limit:2   RTS thr:off   Fragment thr:off
          Encryption key:off
          Power Management:off

eth0      no wireless extensions.
きっちり認識されてる。
Monitorモードにできるか確認
root@kali:~$ airmon-ng check kill
root@kali:~$ airmon-ng start wlan0

root@kali:~$ iwconfig
wlan0mon  IEEE 802.11  Mode:Monitor  Frequency:2.457 GHz  Tx-Power=20 dBm
          Retry short  long limit:2   RTS thr:off   Fragment thr:off
          Power Management:off
wlan0からwlan0monになっており、ModeがMonitorになってることを確認。
(wlan0のままになることもある。以前構築したkaliではwlan0のままでMonitorになった。おそらくiwconfigを使ってmonitorモードに切り替えるとそうなるのかな)
一応Wifiをモニタリングできるかも確認する。
root@kali:~$ airodump-ng wlan0mon
周辺のアクセスポイントがずらずらと出てきたらOK。少し時間かかる場合もある。何も表示されない場合は一度MonitorモードからManagedモードに戻し、再度Monitorモードにすると出来ることがある。
ansibleで設定関連を構築
playbookはこんな感じ。repositoryのupgradeはめっちゃ時間かかるから一通り構築できた後に実行したいため、コメントアウトしてる。
playbook.yml
---
- hosts: all
  become: yes
  tasks:
  - name: update repositories cache
    apt:
      # update_cache: yes
      # cache_valid_time: 86400
      # upgrade: full
  - name: install by apt-get
    apt:
        name:
            - fzf
            - autoconf
            - libtool
            - libssl-dev
            - airgraph-ng

  - name: set default shell zsh
    user:
        name: root
        shell: /bin/zsh

  - name: create a symbolic link - zshrc
    file:
        force: yes
        dest: /root/.zshrc
        src: /vagrant/dotfiles/.zshrc
        state: link

  - name: create a symbolic link - vimrc
    file:
        force: yes
        dest: /root/.vimrc
        src: /vagrant/dotfiles/.vimrc
        state: link

  - name: create a .vim directory
    file:
        follow: yes
        path: /root/.vim/colors
        state: directory

  - name: create a symbolic link - vim theme
    file:
        force: yes
        dest: /root/.vim/colors/jellybeans.vim
        src: /vagrant/dotfiles/jellybeans.vim
        state: link

  - name: create directory for dein.vim
    file:
        follow: no
        path: /root/.vim/dein
        state: directory

  - name: download dein.vim installer
    get_url:
        url: 'https://raw.githubusercontent.com/Shougo/dein.vim/master/bin/installer.sh'
        dest: /root/.vim/dein
        mode: 0755

  - name: install dein.vim
    command: sh /root/.vim/dein/installer.sh /root/.vim/dein
    changed_when: no

  - name: install zsh-anyframe
    git:
        repo: 'https://github.com/mollifier/anyframe'
        dest: /root/.zsh/anyframe
provisionを実行する
~/Desktop/kali-linux
$ vagrant provision
==> default: Running provisioner: ansible_local...
Vagrant has automatically selected the compatibility mode '2.0'
according to the Ansible version installed (2.7.8).

Alternatively, the compatibility mode can be specified in your Vagrantfile:
https://www.vagrantup.com/docs/provisioning/ansible_common.html#compatibility_mode

    default: Running ansible-playbook...

PLAY [all] *********************************************************************

TASK [Gathering Facts] *********************************************************
ok: [default]

TASK [update repositories cache] ***********************************************
....
TASK [install dein.vim] ********************************************************
ok: [default]

TASK [install zsh-anyframe] ****************************************************
ok: [default]

PLAY RECAP *********************************************************************
default                    : ok=12   changed=12    unreachable=0    failed=0
Mac側にansibleがインストールされていなくても大丈夫。ゲストマシン(kali-linux)にインストールされて実行される。
もう一回vagrant provisionを実行しても
$ vagrant provision
TASK [install dein.vim] ********************************************************
ok: [default]

TASK [install zsh-anyframe] ****************************************************
ok: [default]

PLAY RECAP *********************************************************************
default                    : ok=12   changed=0    unreachable=0    failed=0
change=0となっており何回実行しても大丈夫ないわゆる「冪等性」が担保されている、素晴らしいよね。
リポジトリ
今の所apt-getでインストールできないいとか無いから特にいじってない。
が、もし必要になったら下記を参考に設定する。
Kali Network Repositories (apt sources.list) | Kali Linux Documentation